It's been almost two months since my last post. Two months ago I planned to keep hitting the restoration hard, working several days a week. But I took a few weeks off to visit my granddaughters in Hawaii, and a few days off to go sailing (spring is almost here!). Both were time well spent.
This week I took on removing the fuel tank from Talofa Lee. Not surprisingly, removal was a lot easier than removal of the tank from Tensie Mae last year.
The job was no less messy. The first step, cutting the engine beds to allow the tank to come out of the bilge, was the hardest. Unlike on Tensie Mae where the beds were clear of the tank, these engine beds blocked the lifting path for the tank. The beds were built up of three pieces of oak, bolted, epoxied, and glassed together. My reciprocating saw saved the day on their removal. The saw and a steel pry bar were the main tools used. The white oak in these beds was old and tight-grained, harder to cut than the bronze bolts holding it all together. Respirator and eye protection were imperative in the close space with the sawdust and glass dust in the air. Gloves and long sleeves were almost as important to keep the glass off my skin to limit the inevitable itching that comes with glass fibers and dust.
Once the beds were trimmed down, I needed to remove the fiberglass bulkhead forward of the tank. This was the most difficult step in removing Tensie Mae's tank. I tackled if first because I wanted to get it over with. When removing the tank last year, I cut and broke it out by using small hand saws to cut little kerfs in the wall, then breaking little pieces off. The wall was tough and the work area is tight, and breaking more than a small piece off was impossible. It took me days to get the wall removed.
I tried a different approach this year. I de-laminated the bulkhead using a sharp wood chisel and a plastic hammer, weakening the bulkhead. I was able to wedge the chisel between laminations of glass and epoxy. Near the bottom of the bulkhead where I didn't have enough room to swing the hammer, I used a pair of visegrips to break the weakened bulkhead off piece by piece. The bulkhead was gone in less than two hours!
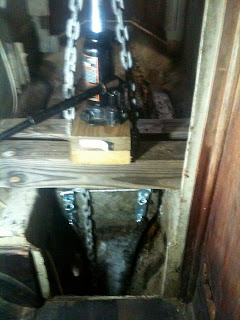
After the bulkhead was removed, I broke the layer of epoxy that sealed the top of the foam bedding enclosing the tank using a ballpeen hammer and a half inch ratchet extension, and pried it loose with a large flat-bladed screwdriver. This step took about an hour and a half. At this point I decided to try to jack the tank out of the bilge. On the advice of others who have replaced their tanks, last year I dug out as much foam as I could by digging in the small crack between the tank wall and the hull. This is a tedious chore, and it takes a long time. I thought that I had nothing to lose if I was unable to jack the tank without digging foam, as I could always dig foam and then remove the tank. The jacking arrangement consists of a small house jack, a chain, some lag eyebolts and old hinges for attachment of the chain to the tank, and some short timbers across the engine beds to support the jack. The eyebolts are then used to pull the tank forward out of the engine room.
My approach was rewarded when the tank was easily lifted from its hole without digging any foam! I moved the tank forward into the main cabin and lifted it out of the boat.
This photo shows the mixture of diesel fuel and water that ran out from under the tank when it was lifted, validating that the tank needed replacing.
The tank had multiple holes in it on both sides and the bottom, from lentil size to golf ball size.
Finally, the foam in the tank void had to be removed. I fashioned a removal tool by taping a piece of strapping to a strip of wood. Using that tool and the flat of a crowbar, I had the foam removed and the void degreased on a bit under two additional hours.
I am glad to have this job done, and glad that it took me less than eight hours to do it (not including the engine bed removal). Working in the small space on my hands and knees, or prone, wore me out. I still have a lot of work to do to prepare the void for the new tank, but I can recover a bit while working on less taxing projects and waiting for the new tank I have ordered from Norsea.


No comments:
Post a Comment